


Lauren Frame
If you want to use the lessons for m@ilgroups or on clubs, E-m@il me for authorisation. Do not hot-link my lessons. Distribution of documents has been permitted in absolutely no manner! All of my lessons applies ©copyright.
(The snapshots where made with Dutch PSP and therefore in the Dutch language)
Marijke, thank you :D for testing.
What you need:
Filters: Filter Unlimited 2.0
Graphic plus
Bordermania
Neology
FM Tile tools
L&K Mayra
Supplies: Download here
Lets get started.
Open up an image and make it 400 high.
With your eye dropper choose a light and dark color for your foreground
and background.
Set your foreground color to the gradient, linear angle 45- repeat 0 invert
on.
Bordermania frame 2, put the 2 upper slides on 1, the rest continues stand.
Add a border of 2px with your dark color
1px with the light color
2px with your dark color
Add a border of 15px with the light color, select the border with you magic
wand.
Filter Graphics plus - Cross Shadow standard.
Select none.
Bordermania frame 2, put the 2 upper slides on 1, the rest continues stand.
Add a border of 25px, select with your magic wand and fill with your gradient.
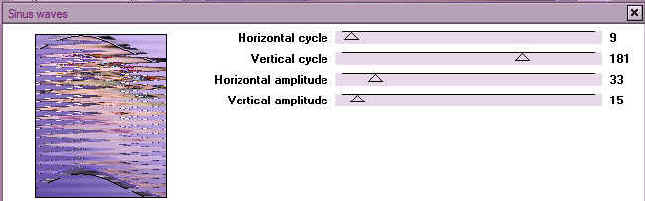
Filter Neology - Sine Waves and apply the following settings.
Edges effects - Enhance.
Filter FM Tile tools - Blend Emboss, standard.
Filter Unlimited2.0 - Buttons and frames - Glass frame 1 both slides on 64.
Select none.
Bordermania frame 2, put the 2 upper slides on 1, the rest continues stand.
Add a border of 2px with your dark color.
1px with the light color.
2px with your dark color.
Add a border of 15px with the light color, select with your magic wand.
Filter Graphics plus - Cross Shadow standard.
Select none
Bordermania frame 2, put the 2 upper slides on 1, the rest continues stand.
Add a border of 35px with the dark color, select and
fill with the gradient.
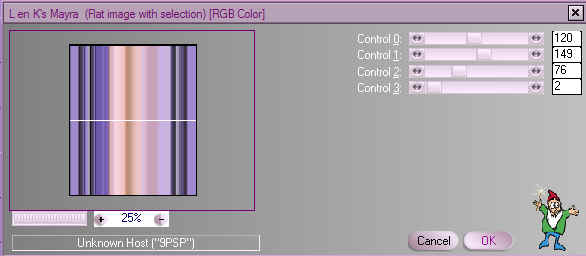
Filter L&K - Mayra and apply the following settings.
Ajust - Sharpness - Sharpen.
FM tile tools - Blend Emboss standard.
Effects - Distortion Effects - Wind 100 of left, repeat but then 100
of Right.
FM tile tools - Blend Emboss standard.
Filter Unlimited2.0 - Buttons and frames - Glass frame 1 both slides
on 64.
Select none.
Resize at 85% and 85% once again.
Bordermania frame 2, put the 2 upper slides on 1, the rest continues stand.
Add a border of 2px with your dark color.
1px with the light color.
2px with your dark color.
Add a border of 15px with the light color, select with you magic wand.
Filter Graphics plus - Cross Shadow standard.
Select none.
Bordermania frame 2, put the 2 upper slides on 1, the
rest continues stand.
Add a border of 1px black.
Put your name or watermark on your creation.
You can add corner of your choice if you like.
For the corner that I have used:
I took the corner from the image with the freehand selection.
Put the corner left under and turn it with your deform tool a bit to
left.
Duplicate layer, and then mirror and flip.
Lock the bottom layer, and merge the 2 corner layers visible.
Duplicate this layer twice.
Activate the upper corner layer.
Noice add/remove - add noise of 10 Gaussiaans and Monochroom.
Go to layer beneeth the upper layer and activate it.
Add noise of 20 Gaussiaans
and Monochroom.
Now go to the third corner layer and add noise of 30 Gaussiaans and
Monochroom.
Go to the bottom layer (your image), unlock it and duplicate this layer twice.
Set all copy layers on lock (see example) (not the background and the merged layer).
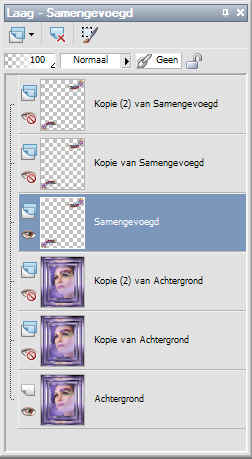
Activate the merged layer and the background layer and merge them visible.
Lock this layer and unlock copy of background and copy
of merge layer.
Merge these layers visible.
Lock these layers also.
Unlock Copy (2) of background and copy (2) of merged layers and merge them
visible.
Unlock all layers, you have three layers now.
Resize your image and save as pspimage.
Open your Animation Shop and search for your saved image.
Go to File - Save as and give your image a name (save it as a .GIF file).
click on save and than next, next, next, to complete your image.
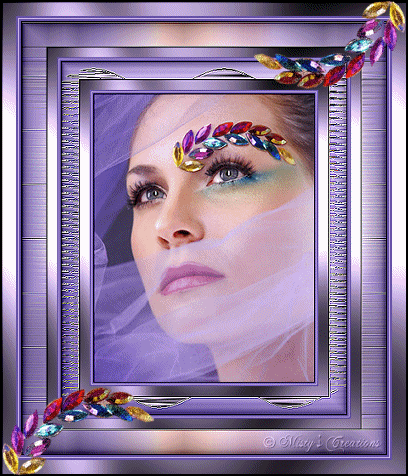
And your frame is ready.
I hope you enjoyed this tut.
Lots of love, Misty